1.Plan Your Windows 8 Clean Install
A Windows 8 clean install involves removing the existing operating system installed on a partition (a previous Windows 8 installation, Windows XP, Linux, Windows 7... it doesn't matter) and then installing Windows 8 from scratch on that same drive. A clean install is also sometimes referred to as a "custom install."
In other words, a clean install of Windows 8 is the erase-whatever-is-there-and-install-a-new-copy-of-Windows-8 process and is usually the best method of installing Windows 8. I always suggest a clean install over upgrading, say from a previous version of Windows like Windows 7. Look through my Installing Windows 8 & 8.1 FAQ if you're having concerns about this.
The walkthrough that follows contains a total of 32 steps, broken into 2 parts, and will guide you through every detail of the Windows 8 or Windows 8.1 clean install process. The process is nearly identical for Windows 8 and Windows 8.1 but I've called out the differences where appropriate.
The most important thing to consider before performing a clean install of Windows 8 is that every bit of information on the drive you're going to install Windows 8 on will be erased. This means that the entire operating system that's on there now, whatever that may be, will be gone, as will all the programs you've installed, and yes, most importantly, all of your precious data you've saved to that drive.
Backup Your Important Data
So the first thing to do, if you can, is to backup whatever data you'd like to keep like your saved documents, downloaded music and videos, etc. Backing up your actual programs isn't usually possible, so locate all the installation media and downloaded installation files that you used to install the programs so they're available to reinstall once the Windows 8 clean install is done. Be sure also to backup any data files from your programs, assuming they have any, that might not be located with your other saved files.
Locate Your Product Key
Your next concern should your product key. This 25-digit alphanumeric code is required during the Windows 8 clean install process. If you've purchased Windows 8 yourself, the product key should be included with the DVD media you received or in the email confirmation you received when you purchased Windows 8 or 8.1 for download. If Windows 8 came preinstalled on your computer, look for a sticker with the product key somewhere on your desktop, laptop, or tablet device.
Note: If you can't locate your Windows 8 product key but the following is true: a) Windows 8 is installed on the computer right now, b) it's working, and c) it was not preinstalled by your computer maker, then you do have the option of extracting the key from your current installation. See How To Find Your Windows 8 or 8.1 Product Key for help doing that.
Disconnect Unnecessary Hardware
Windows 8 should install fine with all of your hardware connected, internal and external, but if you run in to trouble, or have had trouble installing Windows on this computer before, removing unnecessary internal components (if you have a desktop) and disconnecting USB and other external devices should help. Once the Windows 8 clean install is complete, you can reinstall and connect those devices one at a time.
Start the Windows 8/8.1 Clean Install
Once you are absolutely positive that everything on the primary hard drive partition you're about to install Windows 8 on, probably your C: drive, can be removed (e.g. you've backed everything up that you want to keep) then proceed on to the next step in this tutorial. Please remember that once you delete everything from this drive, which is done in a later step (I'll let you know when), you won't be able to get any of that data back.
Note: The procedure described, and screenshots shown, in these 32 steps refer specifically to Windows 8 Pro but are equally valid for the standard Windows 8 edition that's also available, as well as both editions of Windows 8.1 as I mentioned earlier.
Performing a Clean Install of a Version of Windows Other Than Windows 8?
See How Do I Perform a Clean Install of Windows? for specific instructions for your version of Windows.2. Boot From the Windows 8 Installation Media

To start the Windows 8 clean install process, you'll need to boot your computer from whatever installation source you happen to be using: either a DVD disc or a flash drive.
In other words, if you have a Windows 8 DVD and you would like to install Windows 8 from an optical drive, then boot from the Windows 8 DVD. Alternatively, if you have the Windows 8 installation files properly copied to a USB based drive, then boot from the USB device.
Note: See the What To Do... section further down this page if you need to change the media (disc vs flash drive) that you install Windows 8 from, or if you have an ISO file of Windows 8 and you're not sure what to do with it.
There are really three basic steps here:
- Insert the Windows 8 DVD into your optical drive, or plug into a
free USB port the flash drive with the Windows 8 installation files on
it, and then turn on or restart the computer.
- Watch for a Press any key to boot from CD or DVD... message (shown above) if you're booting from a disc, or a Press any key to boot from external device... message if you're booting from a flash drive or other USB device.
- Press a key to force your computer to boot from either the Windows 8 DVD or a flash drive with the Windows 8 installation files on it.
Note: If you see one of the messages above, and your current operating system starts or you receive some kind of error, the most likely reason is that the boot order is set incorrectly. You probably just need to change the boot order in BIOS, being sure to rank the CD/DVD Drive or External Devices entry somewhere before or above the hard drive in the list.
It's also OK if you don't actually see one of the above messages, but the Windows 8 setup process (see the next step) beings automatically. If that happens just consider this step over and move on.
What To Do if Your Windows 8 Installation Media Doesn't Work for You
Considering the facts that Windows 8 can be purchased online and downloaded in ISO file format and that many computers, especially tablets and other smaller computers, don't have optical drives, it's possible you could find yourself with Windows 8's setup files in some format, or on some media, that simply isn't going to work for your computer.
Below are some solutions based on common situations that people find themselves in when preparing to clean install Windows 8:
Problem: You have a Windows 8 DVD but need to be able to install Windows 8 from a USB device. This is probably the most common problem I hear about.
Solution: Locate a flash drive that's at least 4 GB in size and that you can remove all the data from. Then see How To Install Windows 8 From USB for help creating a disc image of the Windows 8 DVD, and then getting that image properly copied onto a USB flash drive.
Problem: You downloaded a Windows 8 ISO File and need to install Windows 8 from a DVD.
Solution: Burn the ISO file to a DVD (or BD) disc. This is not the same as simply burning the ISO file itself to a disc like you would with a music or video file. See How To Burn an ISO Image to a CD/DVD/BD for help.
Problem: You downloaded a Windows 8 ISO File and need to install Windows 8 from a USB device.
Solution: Find a flash drive of at least 4 GB total capacity that you can erase everything on. Then go to How To Install Windows 8 From USB for help getting that ISO file onto a flash drive properly.
Once you have Windows 8 on the installation media that you want, come back here and follow the directions as given above to boot from the disc or flash drive. Then you can continue on with the rest of the Windows 8 clean install process.
3.Wait for the Windows 8 Installation Files to Load

During this time, Windows 8 Setup is preparing by loading files into memory so the setup process can continue. Don't worry, nothing is being erased or copied to your hard drive right now. That all happens a bit later on.
4. Choose Language, Time, and Other Preferences
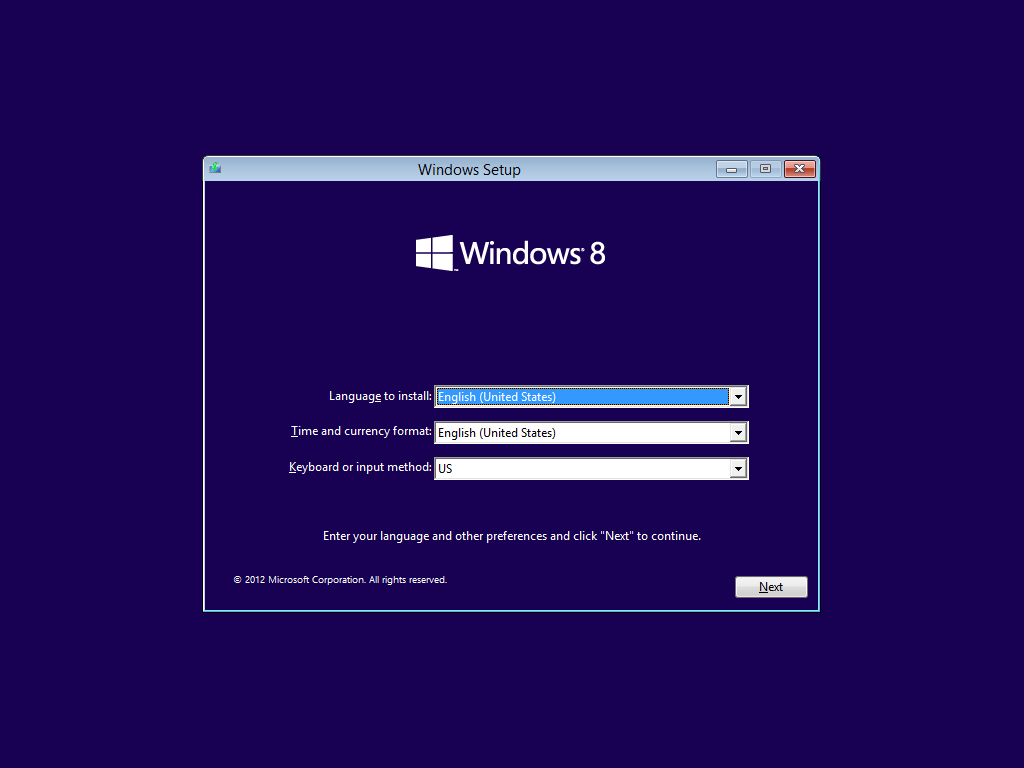
Once your options are selected, click or touch Next.
5. Click Install Now
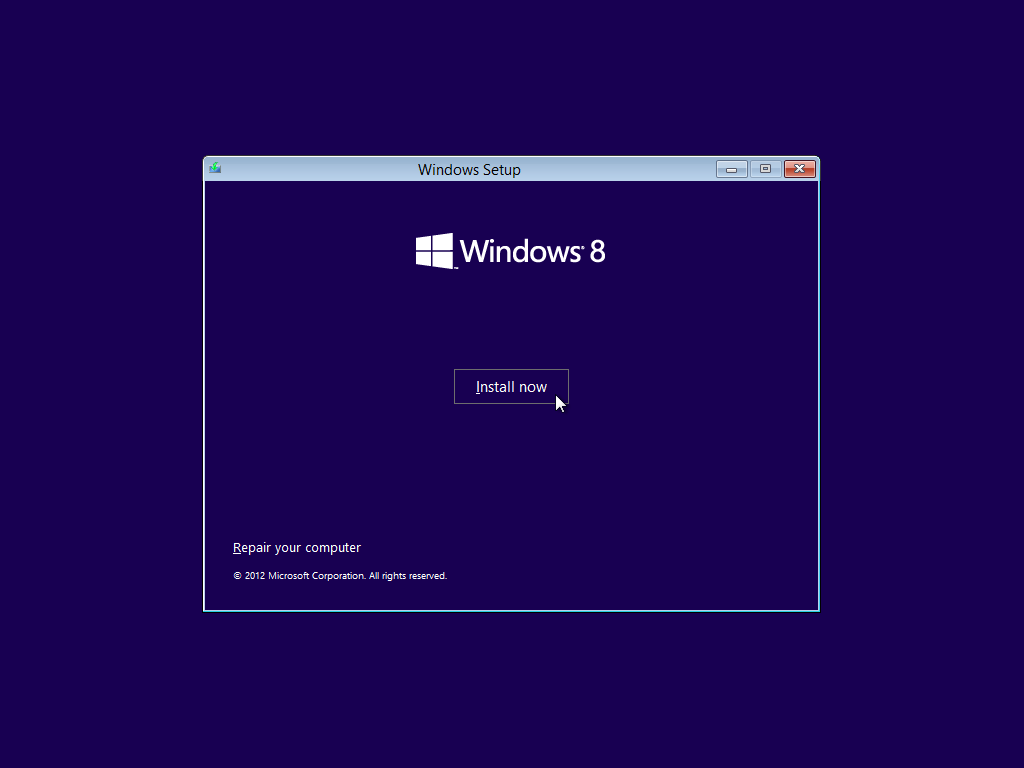
Click or touch the Install now button in the middle of the screen, right under the Windows 8 logo.
This will get the Windows 8 installation process underway.
6. Wait for Windows 8 Setup to Begin

The Windows 8 setup process is now beginning.
Nothing to do here but wait. You might see this screen for several seconds but not for too much longer than that.
7. Enter Your Windows 8 Product Key

Here is where you enter your product key, the 25-digit code you received when you purchased Windows 8. You do not need to enter the dashes that are probably shown as part of your product key.
If you downloaded Windows 8, chances are the product key is in your purchase confirmation email. If you purchased a Windows 8 DVD in a retail store or online, your product key should have been included alongside your disc.
If Windows 8 came preinstalled on your computer, and you are now performing a clean install of Windows 8 on that same computer, your product key is probably located on a sticker located somewhere on your computer or device.
Once you've entered the product key, click or touch Next.
Important: Entering your product key at this point in the Windows 8 clean install process is not optional. This is unlike in previous versions of Windows where you could skip the product key entry during installation as long as you provided one within a certain time frame, usually 30 or 60 days. Also unlike in pervious versions, activating your Windows 8 product key online is automatic and part of this process.
Tip: As I mentioned in the first step in this tutorial, if you've lost your product key, and you're performing a clean install of Windows 8 over an existing, and working, retail copy of Windows 8, then you should be able to extract the valid product key you used to install Windows 8 the last time. See How To Find Your Windows 8 Product Key for help.
8. Accept the Windows 8 Software License Agreement

The next screen you encounter will be the Microsoft Software License Agreement page, which is essentially a giant text box containing the license terms for the edition of Windows 8 you're installing.
Read through the agreement, check the I accept the license terms box, and click or touch Next.
Important: You should always read software license agreements and look for caveats you might not have expected, especially when it comes to operating systems like Windows 8. Microsoft, as well as most other software makers, have strict and legally binding limits as to how many concurrent computers their software can be operated on. For example, a copy of Windows 8 can only be installed on a single computer at a time. In reality, this means one product key per computer... period.
Note: It's completely legal to reinstall Windows 8 via this clean install method. So long as the product key you use to install Windows 8 is only used on one computer at a time, you're not breaking any rules.
9. Choose the Custom Installation Method

The next screen presents you with an important question: Which type of installation do you want?. You have two options: Upgrade and Custom.
Click on, or touch, Custom: Install Windows only (advanced).
Important: Even if you're upgrading from a previous version of Windows to Windows 8, I don't recommend that you upgrade. It sounds like a great option, with your files, settings, and programs all remaining in place, but the reality is often much different. You'll get better performance from Windows 8 and whatever software you choose to install again if you continue with this clean install procedure.
10.Show the Windows 8 Advanced Drive Options

On the Where do you want to install Windows? screen you'll see a list of all the partitions that Windows 8 sees on the computer.
The thing that makes a Windows 8 clean install "clean" is the removal of the partition that the current operating system is installed on, as well as any auxiliary partitions that the operating system was using, usually for recovery purposes. This is what we're going to do over the next several steps.
Windows 8 Setup considers partition management an advanced task so before we can remove any partitions, you'll have to touch or click on Drive options (advanced).
Over the next few steps you'll remove the partition(s) for the operating system that you're replacing with Windows 8. Remember, it doesn't matter what operating system is currently on the computer - an old installation of Windows 8, Ubuntu Linux, Windows 7, Windows XP, etc.
11. Delete the Partition You Plan on Installing Windows 8 Onto

Now that you have access to the full range of partition management options, you can delete any partitions from your hard drive that are used by the currently installed operating system.
Important: Before you delete a partition, please know that all data on that partition will be erased forever. By all data I mean all data: the operating system itself, all installed programs, all saved documents, movies, music, etc. that might be on that drive. It's assumed that, by this point, anything you wanted to keep you've backed up elsewhere.
Highlight the partition you want to delete and then click or touch Delete.
Note: Your list of partitions may differ considerably from mine, which you can see in the screenshot above. I have one 60 GB physical hard drive on my computer that I previous had Windows 8 installed on. My primary partition, which is the C: drive when I'm logged into Windows, is 59.7 GB. That other small partition (350 MB) is a supporting partition that I also plan on deleting, which we'll get to in a few steps.
Warning: If you have multiple hard drives and/or multiple partitions on any of your drives, make sure you're deleting the correct partition(s). Many people have second hard drives or partitions that they use for backup. That's not a drive you want to be deleting.
12.Confirm the Partition Deletion

After choosing to delete the partition, Windows 8 Setup will prompt you to confirm that you really do want to delete the partition.
Important: As I spelled out in the last step, please be aware that all the data stored on this partition that you're removing will be lost forever. If you have not backed up everything you want to keep, click Cancel, end the Windows 8 clean install process, restart your computer to boot back into whatever operating system you have installed, and backup anything you want to keep.
To be completely clear: This is the point of no return! I don't mean to scare you, especially since this is a necessary step to do a Windows 8 clean install. I just want you to have full knowledge of what you're about to do. If you know there's nothing on your primary drive you still need to backup then you should feel completely comfortable continuing.
Click or touch the OK button to delete the selected partition.
13. Delete Other Partitions Used by the Previous Operating System

If there are other partitions that you need to delete, like recovery partitions in use by the previously installed operating system, now is a good time to remove them. You probably only have one of these auxiliary partitions, and probably only if you had a previous version of Windows installed.
For example, in Windows 8, Windows 7, and some Windows Vista installations, a small recovery partition, labeled here as System Reserved, is created and populated automatically during that operating system's installation. The same thing will happen behind the scenes as you continue to clean install Windows 8.
However, you no longer need the one installed by the previous Windows installation so you can remove it.
To do so, repeat the same process you followed to remove the primary partition in the last few steps:
Highlight the partition you want to delete and then touch or click Delete.
Note: You might notice that the first partition we deleted appears to still exist. Look closer, however, and you can tell that it's gone. The description now says Unallocated Space and there's no longer a partition Type listed. In other words, this is now empty space, which we're getting close to putting Windows 8 on.
Important: Again, make sure you're not removing partitions you don't really want to remove. One of these Windows auxiliary partitions will clearly be marked as System Reserved and will be very small, probably 100 MB or 350 MB depending on the version of Windows that you had installed.
14. Confirm Other Partition Deletions

Click or touch OK to confirm.
15. Choose a Physical Location to Install Windows 8

As you can now see, all the space on my hard drive is listed as Unallocated Space. In other words, I have no partitions setup and my soon-to-begin installation of Windows 8 will be "clean" and "from scratch" on this empty drive.
Note: The number of partitions displayed and whether those partitions are unallocated portions of a hard drive, previously partitioned spaces, or previously formatted and blank partitions will depend on your specific setup and what partitions you've deleted in the last several steps.
If you're installing Windows 8 on a computer with just one physical hard drive on which you've just removed all the partitions from, your Where do you want to install Windows? screen should look like mine pictured above, aside from the fact that your drive is probably much bigger than my 60 GB example one.
Select the appropriate unallocated space to install Windows 8 onto and then click or touch Next.
Note: You do not need to manually create a new partition, nor format one, as part of the Windows 8 setup process. These two actions are completed automatically, in the background, between this step and the next.
16.Wait While Windows 8 is Installed

Windows 8 Setup will now begin installing Windows 8 onto the partition it created from the free space you selected in the last step. All you have to do here is wait.
This step is the most time consuming of them all. Depending on your computer specifications, this process could take anywhere from 10 to 20 minutes, possibly more on slower computers.
Note: This part of the Windows 8 installation is completely automatic and the next step involves a reboot of your computer, which you do not give explicit permission to do. So if you step away, and things look different than above, just continue through the next steps until you catch up.
17. Restart Your Computer

As the bulk of the Windows 8 installation process ends, your computer will reboot automatically.
If you happen to catch this screen, which is only there for ten seconds, you can click or touch Restart now to manually force the restart.
Warning: Your computer will likely present you with that Press any key to boot from... option as it starts up again and sees the boot information from your Windows 8 installation media again. Do not press a key or you'll end up booting to the installation disc or flash drive again, which you don't want to do. If you accidentally do that, just restart your computer and don't press anything that time. The installation of Windows 8 should continue again as shown on the next screen.
18. Wait for Windows 8 Setup to Begin Again

Now that your computer has restarted, Windows 8 can continue installing.
There's nothing to do here. Windows 8 Setup has a few important things it still needs to do before it's done but none of them require user intervention.
You might sit at this screen for several minutes before you see Getting devices ready, which I talk about in the next step.
19. Wait for Windows 8 Setup to Install Hardware

In the background, Windows 8 is identifying all of the hardware that makes up your computer and installing the appropriate drivers for those devices, if available.
This process usually takes just a few minutes and you may see your screen flicker and go blank from time to time.
20. Wait for Windows 8 to Finish Installing

During this short stage, Windows 8 Setup is finishing up the last few tasks, like finalizing registry and other settings.
This completes Part 1 of 2!
Please proceed to How To Clean Installation of Windows 8 (Part 2 of 2) to continue.
EmoticonEmoticon